This lab will use a Sketchpad file called lab10.gsp that you can download here.
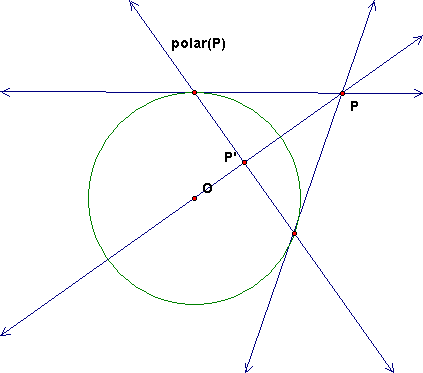
Given a circle c with center O and a point P, there is a special line called the polar of P. This line is defined to be the line perpendicular to line OP and through P', the inversion of P in c. When P is outside the circle, this line also passes through the points of tangency of the tangents to the circle through P.
Question Important Later: For what point(s) is the polar the line at infinity?
Construct the polar of P, either by constructing P' or by using the tool in the prepared lab file. Drag point P inside the circle and make sure your construction works there also.
We saw in class that points on the polar can be constructed from the diagonal points of an inscribed complete quadrangle, as shown here. (The polar is the thick line.)
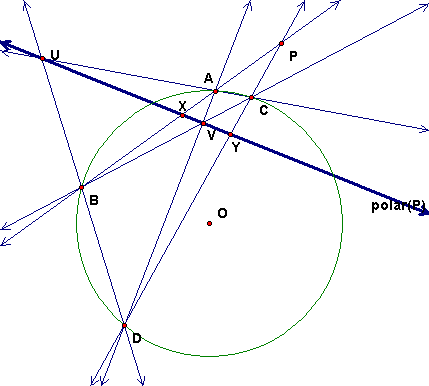
Follow the instructions in the file to construct X and Y on the polar and from them construct A, B, C, D and also U as intersection AC and BC and V as intersection AD and BC. Note that U and V are in fact on the polar.
Now, drag point P inside the circle and observe that the same quadrangle construction will still produce points on the polar, so this gives a ruler method to construct the polar in all cases.
The pole of a line m is a point M. In fact it is the point M so that the polar of M is m. To construct the pole, just construct the point F on m so that OF is perpendicular to m. Then M is the inversion of F.
There are tools for polar and pole in the Lab GSP file. They will be needed for the next experiment.
In a new sketch, construct a circle c and a circle d. Also, construct a point T on d and the tangent line t to d at T.
Now using your polar tool, construct the polar line T' of T in c. Then construct the Locus of T' as T varies. You will get the set of tangent lines of a conic section.
Hide your line locus. Now using your pole tool, construct the pole point t' in c of the tangent line t. Then construct the Locus of t' as t varies. You will get the set of points of a conic section.
To help you figure this out, return to your answer to the Important Question above. For what lines is the pole at infinity? This will tell you for a given d, for what t the poles are at infinity, which tell you the type of conic.
Note: This is really a projective transformation of the circle to the conic. To see this, the clearest way is to write the transformation using coordinates. We shall not do this hear.
There is a theorem about tangents that resembles the theorem of Pascal (technically it is the dual of Pascal). First we can see it for circles:
The theorem is also true for the general conic.
For the point conic, one can construct tangents to the conic by constructing points on circle d and then taking the polars of the point.
Now you can use the conic from the previous construction for exploring the various cases of Pascal's Theorem.
First we construct the sixth vertex of a mystic Pascal hexagon given 5 vertices and a line on which the sixth vertex is located. This translates into being given 5 vertices and 5 sides of a hexagon.
Next, we will use the dynamics of Sketchpad, to draw a conic. To do this, we will animate the line by attaching point J to a circle centered at E.
Now run the animation while you Trace point F. What does this look like. Now move some of your points A, B, C, D, E and clear trace and run the animation again.
Finally, replace the trace with a Locus (select F and J). Then you can hide J and its circle to make the figure look neater. In fact, you can hide everything except the 6 vertices ABCDEF and the conic locus. Experiment with dragging the points around and see how the conic varies.